Twitch Bot Plus
What is the purpose of this Library?
I created this library just to provide a simple & lightweight way to connect to the Twitch IRC without having any extra add-ons or heavy dependencies. This library is designed to be easy to use and flexible for anyone who wants to build a Twitch Bot quickly.
License
This library is distributed under the MIT License and is available for download here.
Sources
Installation - Windows
The installation steps and examples will be shown using Python3.12
This Library should work with Python>=3.10
Step 1:
Create a folder for your project, you can name it whatever you want.
In our case will we name it "twitchbot-tutorial"
Step 2:
Open the Command Prompt and navigate to your project folder using
the cd command. For example:
cd C:\Users\YourUsername\Documents\twitchbot-tutorial
Be sure to replace YourUsername with your actual Windows account name,
otherwise you’ll get;
The system cannot find the path specified.
Step 3:
We will now create a venv (Virtual ENVironment) inside our project folder.
py -3.12 -m venv .venv
This will create a .venv folder, this is a localized Python Virtual Environment
where we can install libraries and only have them available when it's active.
We can activate it via;
.venv\Scripts\activate.bat
And now you Command Prompt should look like this;
(.venv) {YourFolderURL}
Step 4:
We will now use pip to install the library, when you have activated
your Virtual ENVironment, type this;
pip install twitch-bot-plus
We can verify it installed successfully via this command;
pip show twitch-bot-plus
If it returns a structure similar to {below}, then it has successfully installed.;
Step 5:
You have now successfully installed the library!
If you wish to learn how to use, you can scroll down to "How to use"!
How To Use
Step 1:
Assuming you followed the instructions above create 2 files,
main.py and commands.py.
In your main.py enter this;
from TwitchBotPlus import Bot
Step 2:
After you've done that create a variable named something similar to "handle" or "command_handle"
as this will be the IDentifier for commands;
handle = "!"
Some examples of acceptable commands (with the IDentifier above);
- !help
- !shoutout @user
- !random 1 50
- !today
Some examples of incorrect commands (with the IDentifier above);
- -index (wrong prefix, should start with
!) - shoutout @user (missing the
!identifier) - !random 5 -5 (invalid arguments: negative numbers not allowed)
- !todai (typo: command not recognized)
Step 3:
Now it's time for a cruical step. Your .env file!
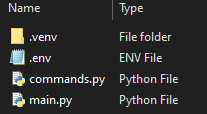
This is how your file structure should look like this.
A screenshot was attached so that errors can be prevented.
Inside your .env fill it out with these requirements;
BOTNAME=
OAUTH_ID=
CLIENT_ID=
CLIENT_SECRET=
TWITCH_REFRESH_TOKEN=
CHANNEL=
Where can you get these values?
- BOTNAME : The account name the Bot will be using.
- OAUTH_ID : ⚠ [Under Construction] ⚠ My Own Project
- CLIENT_ID : From the App you created on Twitch Dev Console
- CLIENT_SECRET : From the App you created on Twitch Dev Console
- TWITCH_REFRESH_TOKEN : ⚠ [Under Construction] ⚠ My Own Project
- CHANNEL : The channel you want the bot to listen to.
Step 4:
After you put the required values inside of the .env file we will move onto getting the
.env file path.
from pathlib import Path
env_file = Path(__file__).resolve().parent / ".env"
Your code should look like this;
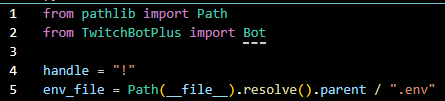
Now let's explain that code piece.
from pathlib import Path
Imports Path for easy directory handling.
env_file = Path(__file__).resolve().parent / ".env"
Creates a path pointing to the .env file in the script’s directory.
Step 5:
Inside of our main.py we will create 4 simple commands.
The commands we will be doing are;
!help
!shoutout <user>
!random <num1> <num2>
!today
We will also add some validation to make sure the correct inputs were added.
Before we add the commands, we must do something else first! And that is create a
Type Alias
to help keep code redudancy to a minimum.
First we need to import a library called Typing;
from typing import CallableCommandsFn = Callable[
#args, user
[list[str], str],
#chat-text, shutdown request
tuple[str, bool]
]
Inside our CommandsFn : Type Alias you’ll notice two comments that
describe its purpose.
The first part defines the inputs each command must take:
list[str]→ every word the user typed, split into a list of argumentsstr→ the username of the person who sent the message
The second part defines the outputs each command must return:
str→ the text that will be sent back to chat (if it’s empty"", nothing is sent)bool→ a shutdown flag; ifTrue, the bot disconnects and stops running
Step 6:
Now a simple step, is to add a Dictionary in main.py
commands: dict[str, CommandsFn] = {
}
This is where we will put our commands!
Step 7:
So now, we will add this part to our main.py and that's almost done.
We will in the following steps add the commands and include them inside of our
main.py!

bot = Bot(
    COMMANDS=commands,
    ENV_Path=env_file,
    HANDLE=handle
)
bot.start()
Step 8:
Now, let's start working on a hello command!
Inside of your commands.py create a function like this;
def Hello(args: list[str], user: str) -> tuple[str, bool]:
    return (f"Hello @{user}!", False)
What this does is, it tells the Bot to send in the chat "Hello @{user}"
Now to import the hello function to our commands, we do these 2 steps;
Inside of main.py enter this;
from commands import helloAnd then inside of the commands dictionary add the hello command;
commands: dict[str, CommandsFn] = {
    "hello": hello
}
Note that whatever you call the string is whatever the bot is listening for in chat.
Also do note that this is not case sensitive as all messages are lowered() if they are a string,
with the exception of the arguments.
Step 9:
Now it's time for validation
We will create another function called rng where it takes 2 arguments.
Inside of commands.py create it with the same args requirements and return type;
def rng(args: list[str], user: str) -> tuple[str, bool]:
Now import random at the top of the script.
Now add this to the rng function;
try:
    num1 = int(args[0])
except Exception as e:
    return f"{user}: Please enter a valid Integer.", False

try:
    num2 = int(args[1])
except Exception as e:
    return f"{user}: Please enter a valid Integer.", False

if num1 > num2:
    return f"First Number: {num1} can't be bigger than Second Number: {num2}", False
So that is validation done, and at the end of the function you should type this;
return f"Your random number is: {random.randint(num1, num2)}", False
At the end, your command should look like this;
def rng(args: list[str], user: str) -> tuple[str, bool]:
    try:
        num1 = int(args[0])
    except Exception as e:
        return f"{user}: Please enter a valid Integer.", False

    try:
        num2 = int(args[1])
    except Exception as e:
        return f"{user}: Please enter a valid Integer.", False

    if num1 > num2:
        return f"First Number: {num1} can't be bigger than Second Number: {num2}", False

    return f"Your random number is: {random.randint(num1, num2)}",False
And then we import it in our main.py and add it to the commands list.
And that is everything done!
If you've done everything correct the bot should start when you run
python main.py
in the terminal!